From Sawdust to Sales: Making and Selling Wooden Wall Shelves with Geometric Designs
Hey there, fellow DIY enthusiasts and aspiring entrepreneurs! Ever looked at a plain wall and thought, "There's gotta be a better way to display my stuff?" Well, guess what? You can turn that thought into a side hustle â€" and a pretty cool one at that. We're talking about crafting and selling wooden wall shelves with geometric designs. It's a winning combination of creativity, practical utility, and potential profit.
Think about it: everyone needs storage, and a good shelf is a timeless solution. But let's spice things up a bit, shall we? Geometric designs are all the rage right now â€" they bring a modern, minimalist touch to any space. So, you've got a product that's both functional and fashionable. Ready to dive in?
Crafting Your Geometric Masterpieces: Step-by-Step
Don't worry if you're not a woodworking whiz. We're starting from scratch. Let's break down the process, making it easy to follow:
1. Get Your Tools in Order
First things first, you'll need some basic tools. Think of it as your woodworking arsenal. You can find these at any good hardware store:
- Circular saw
- Miter saw (optional, but really handy)
- Hand saw (for smaller cuts)
- Sandpaper (various grits)
- Measuring tape
- Level
- Clamps
- Wood glue
- Screwdriver or drill
- Safety glasses and dust mask (always prioritize safety!)
2. Choose Your Wood
This is where you can get creative! There are tons of wood options, each with its own look and feel:
- Pine: Affordable, softwood with a classic look.
- Maple: Strong, durable, and comes in beautiful grain patterns.
- Walnut: Rich, dark color with a unique grain, adds a touch of elegance.
- Oak: Sturdy, long-lasting, with a prominent grain pattern.
- Reclaimed wood: Adds a rustic and eco-friendly touch (often has unique imperfections).
The type of wood you choose will influence the price and style of your shelves. Think about the kind of look you want to achieve and what fits your budget.
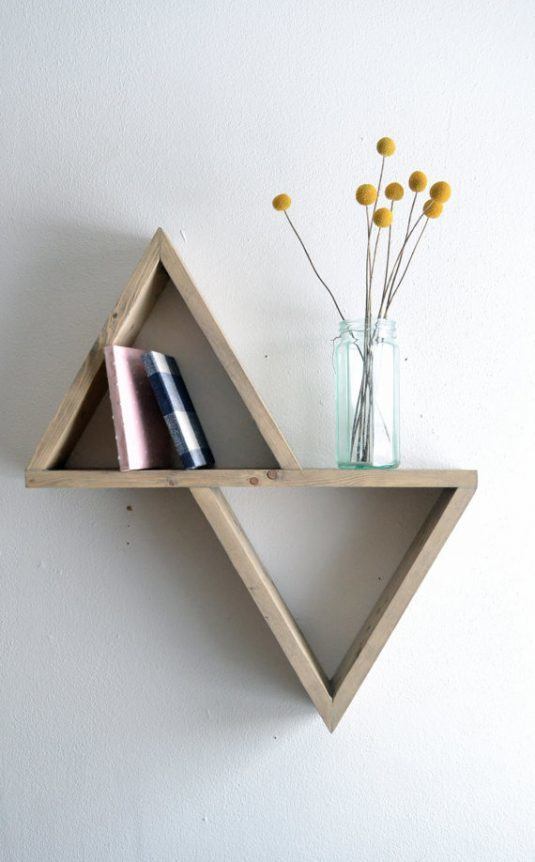
3. Design Your Geometric Shapes
Now for the fun part! Get out your pen and paper, or fire up your favorite design software. Here are a few geometric shapes to get your creative juices flowing:
- Triangles
- Squares
- Hexagons
- Circles (you can cut these with a jigsaw)
- Combination of shapes â€" think a mix of triangles and squares, for example
Don't be afraid to experiment. You can create unique patterns by combining different shapes and sizes.
4. Cut the Wood
Time to put those tools to work! Carefully measure and cut your wood according to your design. Remember to factor in the thickness of the wood for accurate dimensions. Always double-check your measurements before making any cuts. This is where a miter saw can be a lifesaver â€" it's great for making precise cuts at angles.
If you don't have a miter saw, you can use a circular saw and a guide to make straight, angled cuts. Just be extra cautious!
5. Assemble Your Shelf
Glue and screws are your best friends here. Apply a thin layer of wood glue along the edges where you want to join pieces. Then, use screws to securely fasten them together. Make sure the screws are long enough to go through both pieces of wood, but not so long that they poke through the front. Use clamps to hold the pieces together while the glue dries.
6. Sand and Finish
Sanding smooths out rough edges and gives your shelf a polished look. Start with a coarser grit sandpaper (like 80 grit) to remove any major imperfections. Then, gradually work your way up to finer grits (like 120, 180, and 220) to create a smooth, even surface. Be sure to sand in the direction of the wood grain.
You can choose a finish that complements the wood and your overall design:
- Paint: Choose a color that reflects your style.
- Stain: Enhances the natural beauty of the wood.
- Polyurethane: Adds a protective layer that resists scratches and water damage.
- Oil finish: Soaks into the wood, creating a natural-looking finish.
Apply the finish evenly and let it dry completely according to the manufacturer's instructions.
Marketing Your Shelves: Spreading the Word
You've got beautiful, unique shelves. Now it's time to share them with the world! Here's how to market and sell your creations:
1. Build an Online Presence
These days, you can't escape the digital realm! Create an online shop to showcase your work. Etsy is a fantastic platform for handmade items, but consider other options like your own website or social media pages.
2. Professional Photography
First impressions matter! Invest in good quality photos that highlight the details and beauty of your shelves. Showcase them in a variety of settings and with different decor items to give potential buyers ideas.
3. Craft Fairs and Markets
Getting out there in person can be super valuable. Connect with customers at craft fairs, flea markets, or local events. You can even offer a discount for purchases made in person.
4. Collaborate with Other Artists
Team up with other creatives! Maybe a local artist would love to create artwork for your shelves, or a potter could provide decorative bowls to showcase. This cross-promotion helps both of you reach a broader audience.
5. Word-of-Mouth Marketing
Don't underestimate the power of referrals! Happy customers are your best brand ambassadors. Encourage them to share their positive experiences with friends and family.
Commonly Asked Questions
Here are some questions you might be wondering about:
1. What if I'm not very good at woodworking?
Don't let that stop you! Start with simple designs and practice. There are tons of online tutorials and workshops that can teach you the basics. Plus, you can always enlist the help of a friend or family member who is handy.
2. How much should I charge for my shelves?
Consider your costs (materials, time, and any additional expenses) and the value of your unique creations. Research what other artisans are charging for similar pieces to get an idea of the market price. Start by pricing your shelves competitively, and you can always adjust them later based on demand.
3. What if no one buys my shelves?
Don't get discouraged! Marketing takes time and effort. Keep creating, promoting, and refining your strategy. Experiment with different platforms, designs, and pricing to find what works best for you. The key is to be persistent and passionate about your work.
Remember, you're not just building shelves; you're creating something beautiful and functional. With a little patience, practice, and a whole lot of creativity, you can turn your passion into a successful business.


